North Lauderdale Water Damage Repair after Plumbing Leaks: Step-by-Step Process Explained
Plumbing leaks are one of the most common causes of water damage in North Lauderdale homes and rental properties. A small drip behind a wall, a pinhole leak in a supply line, or a slow drain leak under a sink can quietly soak drywall, cabinets, flooring, and insulation long before anyone notices.
Even after a plumber fixes the pipe, the job is not automatically “done.” Moisture can remain trapped inside building materials, and in South Florida’s humid conditions, that trapped moisture can lead to odors, warped floors, recurring stains, and mold growth.
This step-by-step guide explains how water damage repair is properly handled after plumbing leaks in North Lauderdale, and what property owners should expect from inspection through full repair.
What Water Damage from Plumbing Leaks Really Is
Water damage is not just visible staining. It is any situation where building materials absorb moisture beyond normal levels. Drywall, wood framing, cabinet bases, and flooring can hold water for days or weeks if not dried correctly.
After plumbing leaks, damage commonly affects:
• Drywall and baseboards
• Cabinet toe-kicks and vanity bases
• Flooring (laminate, wood, carpet, tile underlayment)
• Insulation inside walls
• Subfloors and slab edges
• Adjacent rooms where water travels quietly
Because water follows gravity and low points, the visible stain is often not the true extent of the moisture.
Why This Happens So Often in North Lauderdale
North Lauderdale and nearby Broward County communities like Margate, Coconut Creek, Pompano Beach, Deerfield Beach, and Fort Lauderdale share the same local conditions that make leaks more damaging:
• High humidity slows natural drying
• AC use keeps homes closed up and recirculating air
• Slab foundations hide plumbing lines and allow leaks to spread
• Older plumbing connections fail over time
• Tenant turnover in rentals leads to delayed reporting
• Small leaks become “background problems” until damage is visible
In many cases, a leak can be present for weeks before anyone realizes moisture is spreading behind walls or under floors.
Common Early Signs Homeowners Notice
Plumbing leak damage often shows up in small, easy-to-ignore ways first. Early signs include:
• Musty smell under sinks or near walls
• Slight bubbling or peeling paint
• Soft or spongy drywall near plumbing lines
• Warped baseboards or flooring edges
• A cabinet that smells damp even after cleaning
• Unexplained humidity in one room
• Stains that “come back” after being painted
If you notice these signs, it usually means moisture is still present in materials, even if the plumbing repair is complete.
Hidden or Overlooked Areas Where Moisture Spreads
In North Lauderdale homes, leaks commonly spread into hidden cavities and stay there.
High-risk hidden areas include:
• Behind kitchen and bathroom cabinets
• Inside walls behind showers and tubs
• Under sink bases and along cabinet sides
• Around toilet wax rings and supply lines
• Laundry wall boxes and washing machine hoses
• Water heater pans and surrounding drywall
• Inside AC closets when drain lines overflow
• Under flooring where water wicks and spreads
These areas often need moisture detection tools to confirm what is wet and what is dry.
Why DIY Drying Usually Fails
Fans and open windows help a little, but they rarely solve water damage after plumbing leaks in Florida.
DIY drying usually fails because:
• Airflow doesn’t reach inside wall cavities
• Flooring traps moisture underneath
• Humid outdoor air slows evaporation
• Materials “feel dry” on the surface but remain wet inside
• No moisture readings are taken to confirm dryness
When moisture remains, odors, stains, and mold growth often follow.
Step 1: Stop the Water and Document the Area
The first step is always stopping the source. This typically means a plumber repairing the leak or shutting down the affected line.
Once the leak is stopped, the next practical step is documenting:
• Where the leak occurred
• What materials are affected
• How long the water may have been present
• Any visible staining or swelling
For property owners and managers, photos taken early help track changes and support repair planning.
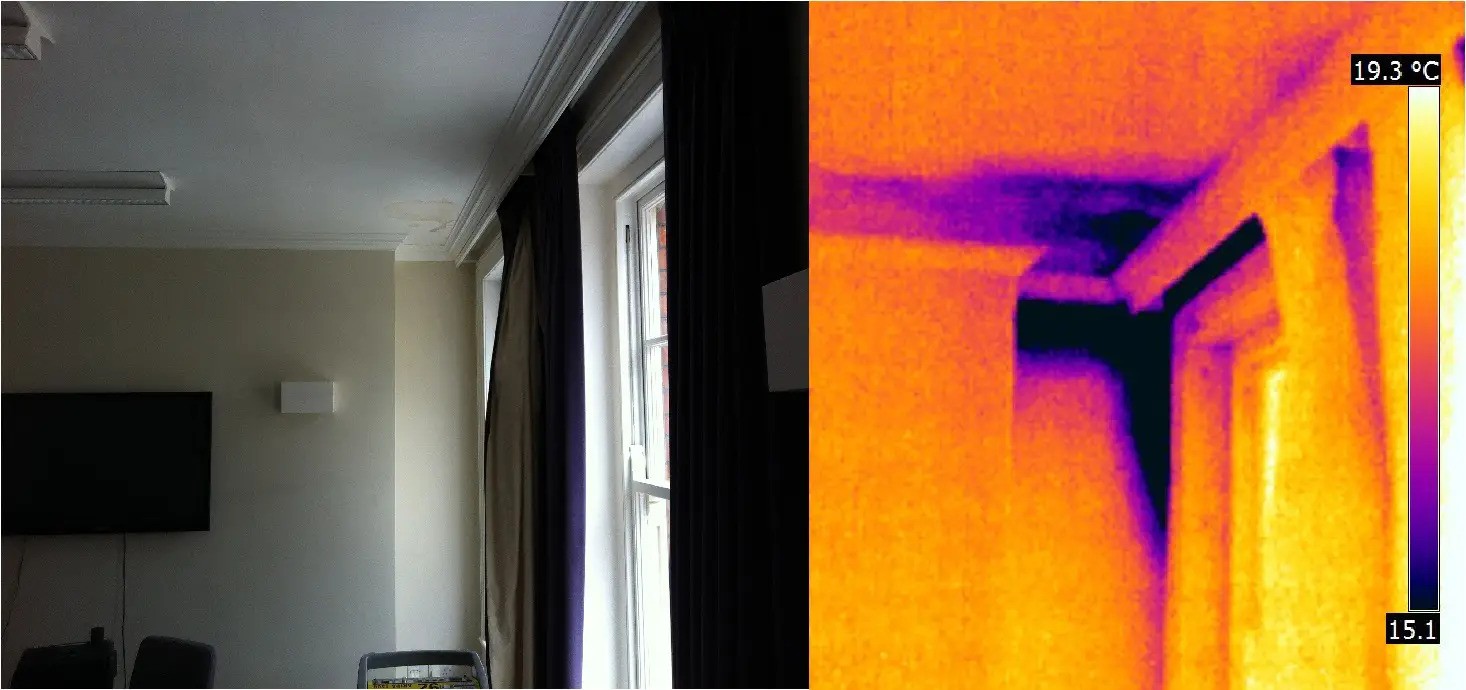
Step 2: Professional Inspection and Moisture Detection
A proper water damage repair process begins with moisture detection. Professionals use moisture meters and, when helpful, thermal imaging to locate wet areas that are not visible.
This inspection typically includes:
• Scanning walls around the leak area
• Checking adjacent rooms and flooring edges
• Inspecting cabinet bases and toe-kicks
• Checking ceilings below upstairs plumbing
• Evaluating whether water reached insulation
This step prevents missed pockets of moisture that later cause recurring problems.
Step 3: Decide What Must Be Removed and What Can Be Dried
Not all materials can be saved, especially if they have been wet too long.
Professionals determine whether to:
• Remove wet drywall sections to access cavities
• Pull baseboards to allow drying behind them
• Remove saturated insulation
• Lift flooring if moisture is trapped underneath
• Dry cabinets if they are structurally sound
The goal is to remove only what is necessary, while ensuring nothing stays wet.
Step 4: Water Extraction (If Needed)
If water is still present in carpets or low areas, extraction is performed using commercial equipment. Even small amounts of trapped water under carpet pads or in cabinet bases can delay drying.
Extraction reduces drying time and prevents odors from developing.
Step 5: Structural Drying and Dehumidification
This is the step many property owners underestimate. Proper drying requires controlled equipment that pulls moisture out of building materials, not just surface air.
Drying typically includes:
• High-velocity air movers positioned for airflow paths
• Commercial dehumidifiers to remove moisture from air
• Targeted drying for wall cavities and under cabinets
• Controlled temperature and humidity monitoring
In humid Broward County conditions, dehumidification is critical. Without it, fans may simply move humid air around without actually drying materials.
Step 6: Daily Moisture Monitoring and Adjustments
Professional drying is not “set it and forget it.” Moisture levels are monitored regularly to confirm progress.
Monitoring includes:
• Moisture readings in drywall, wood, and flooring
• Humidity measurements inside the home
• Adjusting equipment placement for best results
• Confirming drying goals are met before repairs begin
This step prevents premature repairs that trap moisture behind new drywall or flooring.
Step 7: Cleaning, Sanitizing, and Odor Control
Once materials are dry, surfaces are cleaned and sanitized as needed, especially in enclosed spaces like under sinks or behind cabinets where bacteria and odors can develop.
Depending on conditions, this may include:
• Cleaning and disinfecting affected surfaces
• Treating odor-prone areas
• Cleaning debris left from demolition or drying
If mold is suspected, additional mold inspection and testing may be recommended before rebuilding.
Step 8: Mold Inspection and Testing When Needed
Not every plumbing leak causes mold, but in Florida, it is common when moisture sits too long.
Mold inspection and testing may be recommended when:
• Musty odors remain after drying
• Visible spots appear on drywall or framing
• The leak was active for more than a couple of days
• Tenants report recurring irritation or odors
• The property has a history of moisture issues
Pompano Mold Inspection and Testing can help confirm whether mold contamination exists and whether remediation is necessary, allowing repairs to move forward confidently.
Step 9: Repair and Restoration Work
After drying and cleaning are confirmed complete, repairs begin. Water damage repair often involves restoring materials to their original condition.
Common repair tasks include:
• Drywall patching and repainting
• Baseboard replacement and sealing
• Cabinet repairs or replacement when needed
• Flooring repair or replacement
• Re-caulking and moisture-proofing vulnerable areas
In rental properties, careful restoration also helps prevent repeat tenant complaints and reduces future maintenance calls.
Step 10: Preventing the Same Leak Damage from Happening Again
Once repairs are done, prevention matters. Many “repeat” water damage cases in North Lauderdale happen because the underlying risk is never addressed.
Smart prevention steps include:
• Inspecting under sinks regularly
• Replacing aging supply lines proactively
• Installing water alarms in kitchens and laundry areas
• Keeping AC drain lines maintained to avoid overflows
• Sealing cabinet bases and toe-kicks where practical
• Ensuring bathrooms and laundry areas ventilate moisture properly
A little preventative maintenance saves significant repair costs over time.
Air Ducts, AC Systems, and Leak-Related Moisture
Plumbing leaks sometimes affect ceilings and duct pathways, especially in multi-story homes or buildings. Moisture can also enter AC closets where drain lines and plumbing share space.
After leaks, it is important to check:
• AC closets for dampness and mold odors
• Duct insulation near wet areas
• Return vents that may have pulled in humid air during drying
• Filters and airflow to maintain good ventilation
If ductwork became wet, duct cleaning or insulation replacement may be needed to prevent ongoing odors and air quality issues.
Why Local Experience Matters
Water damage repair in North Lauderdale is different from drier regions. High humidity, heavy AC use, and slab foundations change how water spreads and how long drying takes.
Professionals familiar with Broward County properties understand:
• Where leaks typically travel in slab homes
• How humidity affects drying timelines
• Which materials are most likely to trap moisture
• How to prevent repeat damage in rentals and older homes
Local experience helps property owners avoid unnecessary demolition while ensuring no moisture is left behind.
A Calm, Practical Next Step
If your North Lauderdale property has had a plumbing leak — even a “small one” — the safest next step is a professional moisture inspection. It’s the easiest way to confirm what is truly dry and what still needs attention.
Water damage becomes expensive when it is ignored. When it is handled early, repair is usually straightforward and far less disruptive.
If you’re unsure whether moisture remains after a leak repair, a proper inspection can give you clear answers and a practical plan to restore the property confidently.